Install, manage, and upgrade extensions
You can extend your Magento application capabilities by adding an extension from the Magento Marketplace. For example, you can add a theme to change the look and feel of your storefront, or you can add a language package to localize your storefront and Admin panel.
We highly recommend that you have your Magento application fully deployed to an Integration or Staging environment before attempting to add a module. Always work in a development branch when adding a module to your implementation. If you do not have a branch, see Get started creating branches.
Composer name of an extension
Although this section discusses how to get the Composer name and version of an extension or module from Magento Marketplace, you can find the name and version of any module (whether or not you purchased it on Marketplace) in the Composer file of the module. Open the composer.json file in a text editor and note the "name" and "version" values.
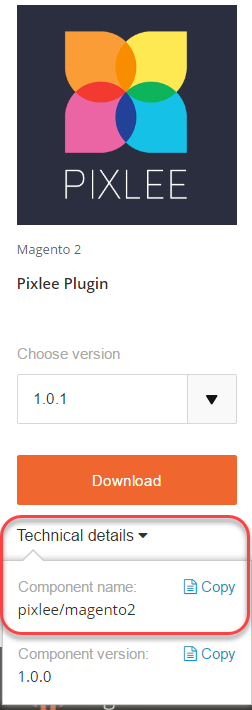
To get the Composer name of a module from the Magento Marketplace:
-
Log in to Magento Marketplace with the username and password you used to purchase the component.
-
In the upper right corner, click Username > My Account.

-
On the My Account page, click My Purchases.

-
On the My Purchases page, click Technical Details for the module you purchased.
-
Click Copy to copy the component name to the clipboard.
-
Open a text editor and paste the module name.
-
Append a colon character (
:) to the component name. -
In Technical Details on the My Purchases page, click Copy to copy the version to the clipboard.
-
Append the version number to the component name after the colon.
A sample follows:
1
pixlee/magento2:1.0.1
Install an extension
We recommend working in a development branch when adding an extension to your implementation. If you do not have a branch, see the Get started creating branches topic. When installing an extension, the extension name (<VendorName>_<ComponentName>) is automatically inserted in the app/etc/config.php file. There is no need to edit the file directly.
To install an extension:
-
On your local workstation, change to the Cloud project root directory.
-
Create or checkout a development branch. See branching.
-
Using the Composer name and version, add the extension to the
requiresection of thecomposer.jsonfile.1
composer require <extension-name>:<version> --no-updateFor example:
1
composer require pixlee/magento2:1.0.1 --no-update -
Update the project dependencies.
1
composer update
-
Add, commit, and push code changes.
1
git add -A
1
git commit -m "Install <extension-name>"
1
git push origin <branch-name>
When installing an extension, you must include the
composer.lockfile when you push code changes to the remote environment. Thecomposer installcommand reads thecomposer.lockfile to enable the defined dependencies in the remote environment. -
After the build and deploy finishes, use a SSH to log in to the remote environment and verify the extension installed.
1
bin/magento module:status <extension-name>
An extension name uses the format:
<VendorName>_<ComponentName>.Sample response:
1
Module is enabled
If you encounter deployment errors, see extension deployment failure.
Manage extensions
When you add an extension using Composer, the deployment process automatically enables the extension. If you already have the extension installed, you can enable or disable the extension using the CLI. When managing extensions, use the format: <VendorName>_<ComponentName>. Never enable or disable an extension while logged in to the remote environments.
To enable or disable an extension:
-
On your local workstation, change to the Cloud project root directory.
-
Enable or disable a module. The
modulecommand updates theconfig.phpfile with the requested status of the module.Enable a module.
1
bin/magento module:enable <module-name>
Disable a module.
1
bin/magento module:disable <module-name>
-
If you enabled a module, use
ece-toolsto refresh the configuration.1
./vendor/bin/ece-tools module:refresh
-
Verify the status of a module.
1
bin/magento module:status <module-name>
-
Add, commit, and push code changes.
1
git add -A
1
git commit -m "Disable <extension-name>"
1
git push origin <branch-names>
Upgrade an extension
Before you continue, you need the Composer name and version for the extension. Also, confirm that the extension is compatible with your project and Magento Commerce Cloud version. In particular, check the required PHP version before you begin.
To update an extension:
-
On your local workstation, change to the Cloud project root directory.
-
Create or checkout a development branch. See branching.
-
Open the
composer.jsonfile in a text editor. -
Locate your extension and update the version.
-
Save your changes and exit the text editor.
-
Update the project dependencies.
1
composer update
-
Add, commit, and push your code changes.
1
git add -A
1
git commit -m "Update <extension-name>"
1
git push origin <branch-names>
If you encounter errors, see [extension deployment failure][].