Step 2: Add templates
Magento Commerce only
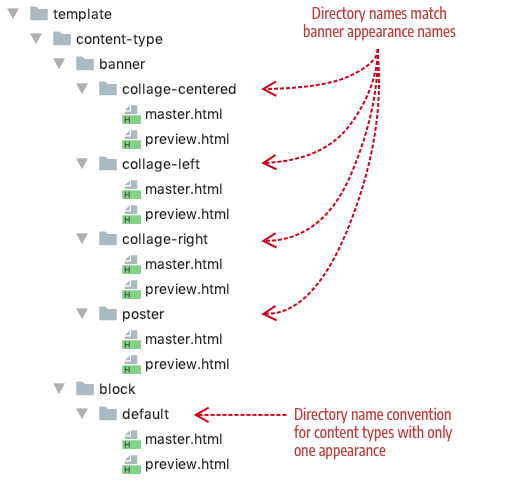
Content type templates are the HTML files (HTML fragments) that define how your content type appears on both the Admin stage and within your storefront. The combination of these templates (one preview.html and one master.html) creates an appearance. As discussed in the previous configuration step, you must have at least one appearance (two templates) defined for your content type. But like the Banner, you can define several appearances for users to choose from as shown here:

Template conventions
Conventions for adding content type templates are as follows.
-
Page Builder requires you to name your templates
preview.htmlfor the Admin preview template andmaster.htmlfor the master format storefront template. -
Page Builder requires the name of an
appearanceto match the name of the directory containing the appearance templates. If they don’t match, your content type appearances will not render.For example, if you navigate to the Banner’s appearance templates (
PageBuilder/view/adminhtml/web/template/content-type/banner) you can see that the names of the template directories match the names of the four appearances defined in thebanner.xmlconfiguration file as shown here:1 2 3 4 5 6
<appearances> <appearance name="collage-left"...> <appearance name="collage-centered"...> <appearance name="collage-right"...> <appearance name="poster" default="true" ...> </appearances>

For content types with only one appearance (as noted in the screenshot with block), we use the name default for both the content type’s appearance name and the name of the template directory.
Template configuration
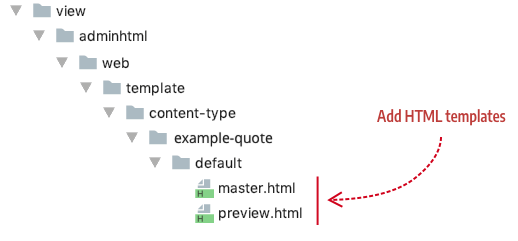
The Quote example defines only one appearance. Therefore, by convention, set the name of the Quote appearance and the name of the template directory to default as shown here:
1
2
3
<appearances>
    <appearance name="default"
    ...

These files can be blank initially; they just need to exist in their proper location for now so we can reference them in the appearance element of our example_quote.xml configuration file as shown here:
1
2
3
4
5
6
7
8
9
<appearances>
    <appearance name="default"
              default="true"
              preview_template="Example_PageBuilderQuote/content-type/example-quote/default/preview"
              master_template="Example_PageBuilderQuote/content-type/example-quote/default/master"
              reader="Magento_PageBuilder/js/master-format/read/configurable">
    <elements...>
    </appearance>
</appearances>
The following table describes each appearance attribute in our example.
| Attribute | Description |
|---|---|
name |
As noted by convention, the name of the appearance and the name of the directory for the appearance templates must match. |
default |
Every content type must have a default appearance. If you only define one appearance for your content type, you must set the default to true. |
preview_template |
References the preview.html (the Admin preview template) for rendering the preview appearance of your content type on the stage within the Admin UI. |
master_template |
References the master.html (the master format storefront template) for rendering the appearance of your content type on the storefront for customers to see. |
reader |
Reads content type data from the master format. |
Quote preview_template
The Quote preview_template (preview.html) is shown here in full, followed by the attribute descriptions to help you understand the basics of content type templates.
1
2
3
4
5
6
7
8
9
10
11
12
13
14
15
16
17
18
19
20
21
22
23
24
25
<!-- preview.html -->
<div attr="data.main.attributes"
     ko-style="data.main.style"
     class="pagebuilder-content-type"
     css="data.main.css"
     event="{ mouseover: onMouseOver, mouseout: onMouseOut }, mouseoverBubble: false">
    <render args="getOptions().template" />
    <blockquote attr="data.quote.attributes"
              ko-style="data.quote.style"
              css="data.quote.css"
              data-bind="liveEdit: { field: 'quote_text', placeholder: $t('Enter Quote') }">
    </blockquote>
    <div class="quote-author"
       attr="data.author.attributes"
       ko-style="data.author.style"
       css="data.author.css"
       data-bind="liveEdit: { field: 'quote_author', placeholder: $t('Enter Author') }">
    </div>
    <div class="quote-title"
       attr="data.author_title.attributes"
       ko-style="data.author_title.style"
       css="data.author_title.css"
       data-bind="liveEdit: { field: 'quote_author_desc', placeholder: $t('Enter Description') }">
    </div>
</div>
attr
The attr attribute allows binding of data from the content type form (UI component) to the html elements in the template.
The value for attr is derived from the element name in the configuration file followed by attributes. For example, the attr value used to bind data for the blockquote on line 8 of the Quote preview.html is attr="data.quote.attributes". This corresponds to the element named quote in the example_quote.xml configuration file, as shown here:
1
2
3
4
5
<!-- example_quote.xml -->
<element name="quote">
    <html name="quote_text" converter="Magento_PageBuilder/js/converter/html/tag-escaper"/>
    <css name="quote_css"/>
</element>
The nodes declared within an element define the bindings that can be applied to your templates.
ko-style
The ko-style attribute applies the <style> attributes from the form to a template element. For example, the main element for the Quote configuration defines several style bindings as shown here:
1
2
3
4
5
6
7
8
9
10
11
12
<!-- example_quote.xml -->
<element name="main">
    <style name="text_align" source="text_align"/>
    <style name="border" source="border_style" converter="Magento_PageBuilder/js/converter/style/border-style"/>
    <style name="border_color" source="border_color"/>
    <style name="background_color" source="background_color"/>
    <style name="border_width" source="border_width" converter="Magento_PageBuilder/js/converter/style/border-width"/>
    <style name="border_radius" source="border_radius" converter="Magento_PageBuilder/js/converter/style/remove-px"/>
    <style name="margins" storage_key="margins_and_padding" reader="Magento_PageBuilder/js/property/margins" converter="Magento_PageBuilder/js/converter/style/margins"/>
    <style name="padding" storage_key="margins_and_padding" reader="Magento_PageBuilder/js/property/paddings" converter="Magento_PageBuilder/js/converter/style/paddings"/>
    ...
</element>
As we discuss more in Step 4: Add form, the element styles define bindings to fields in our form. In turn, these form fields provide user-entered data or default values that we apply to the HTML elements in our templates using the ko-style attribute.
The following snippet shows the ko-style (Knockout binding) that applies the styles defined in the main element to the div node of the Quote’s Admin preview template:
1
2
3
4
<!-- preview.html -->
<div attr="data.main.attributes" ko-style="data.main.style"...>
<!-- other template elements -->
</div>
The ko-style value is derived from the configuration element name (main) and the attribute to be bound (style) to give us data.main.style.
css
The css attribute applies CSS classes entered by users on the form to a template element. More on this when we discuss forms in Step 4: Add form.
class
Just as with any other HTML template, you can add your own classes to your template elements. However, always add the pagebuilder-content-type as the first class in the top node in your preview.html template as shown for the Quote. Page Builder uses the pagebuilder-content-type class to add visual indicators and mouseover effects to the Admin preview template, such as correctly positioning the options menu. Defining custom LESS/CSS classes for your content type is discussed in Step 5: Add styles.
liveEdit
The liveEdit binding enables end users to enter HTML content directly on the Admin stage. The basic usage from the Quote control includes specifying the form field it binds to and adding placeholder text as follows:
1
2
3
4
<!-- preview.html -->
<blockquote attr="data.quote.attributes"
            data-bind="liveEdit: { field: 'quote_text', placeholder: $t('Enter Quote') }">
</blockquote>
event
The event attribute enables the options menu to be shown and hidden when users interact with the content type using the mouse. If you have a special circumstance with the way you wish to handle your option menus, you can modify this logic to suit your needs.
Quote master_template
The Quote master_template (master.html) is shown here in full. The same attributes and descriptions from the preview.html template apply to the master.html template as well. However, the master.html template introduces one addition attribute, html, which is described after the code.
1
2
3
4
5
6
7
8
9
10
11
12
13
14
15
16
17
18
19
20
21
<!--master.html-->
<div attr="data.main.attributes">
    <blockquote class="quote-content"
              attr="data.quote.attributes"
              ko-style="data.quote.style"
              css="data.quote.css"
              html="data.quote.html">
    </blockquote>
    <div class="quote-author"
       attr="data.author.attributes"
       ko-style="data.author.style"
       css="data.author.css"
       html="data.author.html">
    </div>
    <div class="quote-title"
       attr="data.author_title.attributes"
       ko-style="data.author_title.style"
       css="data.author_title.css"
       html="data.author_title.html">
    </div>
</div>
html
The html attribute applies the actual user-entered HTML content to the template element. In our Quote example, the end-user enters their quote text either on the Admin stage using liveEdit (which is bound to the quote_text field in the form editor) or on the form, directly into thequote_text field itself.
For example, from the Quote preview.html template, the liveEdit binding on the blockquote is bound to the quote_text field that stores the HTML content, as shown here ({ field: 'quote_text'...}):
1
2
3
<!--preview.html-->
<blockquote data-bind="liveEdit: { field: 'quote_text', placeholder: $t('Enter Quote') }">
</blockquote>
The master format storefront template uses the html attribute to retrieve the HTML content and display it in the blockquote element as follows:
1
2
<!--master.html-->
<blockquote html="data.quote.html"></blockquote>
The html value is derived from the configuration element name (quote) and the attribute to be bound (html) to give us data.quote.html.
1
2
3
4
<element name="quote">
    <html name="quote_text" converter="Magento_PageBuilder/js/converter/html/tag-escaper"/>
    ...
</element>