How to upgrade content types
Magento Commerce only
Before version 1.3, changes to a content-type configuration could (and usually would) break the existing content that was saved with the previous configuration. Why? Because a content type’s configuration maps data from its source (the master format) to its display templates. So when the configuration mapping changes, the display of existing content might also change. With significant configuration changes, data (such as styles, attributes, and html) is lost. Such changes cause existing content to appear incorrectly, or not at all.
To fix this limitation for versions 1.3+, Page Builder uses Magento’s native upgrade mechanism, coupled with our content upgrade helpers. These helpers convert existing content so that it maps to new configurations and displays correctly.
Example: Updating the Row content type
Let’s imagine that the Page Builder team needs to change the configuration of the Row’s full-width appearance to fix a layout issue. The fix is simple. We need to move a style attribute from one element in the Row’s full-width appearance to another element. But without the upgrade helpers, our change to the Row’s configuration would break all previously saved Page Builder content that uses Rows. And because all Page Builder content is wrapped in a Row, changing the Row would break all Page Builder content!
To fix this issue, we created a set of Page Builder DOM helper classes (Magento\PageBuilder\Model\Dom\*) that we can use to update all our native content types (including the Row) that have already been stored in the database.
Steps overview
There are three steps to upgrading a content type when changing its configuration:
- Create a Converter (Example:
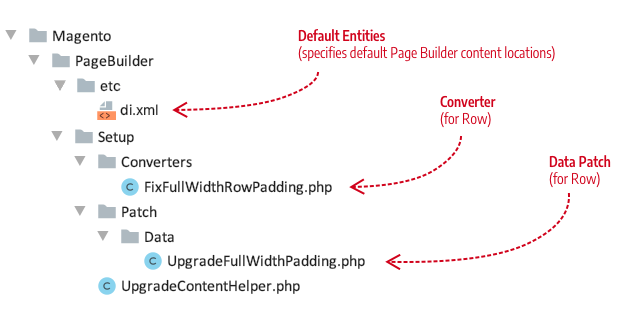
FixFullWidthRowPadding.php) - Create a Data Patch (Example:
UpgradeFullWidthPadding.php) - Update the UpgradableEntitiesPool (for custom entities)(
Magento\PageBuilder\Model\UpgradableEntitiesPool)
For our Row example, the Page Builder team would add the following files to the Magento/PageBuilder/Setup directories:

Step 1: Create a Converter
For our Row example, the first task is to create a converter class that implements the DataConverterInterface. Specifically, it implements the convert function where it uses Page Builder’s DOM helper classes to change the DOM of the Row content type within each master format it receives.
Our converter class for fixing a row padding problem might be called FixFullWidthRowPadding, with the following example implementation:
1
2
3
4
5
6
7
8
9
10
11
12
13
14
15
16
17
18
19
20
21
22
23
24
25
26
27
28
29
30
31
32
33
34
35
36
37
38
39
40
41
42
43
44
45
46
47
48
49
50
51
52
53
54
55
56
57
58
<?php
/**
 * Copyright © Magento, Inc. All rights reserved.
 * See COPYING.txt for license details.
 */

declare(strict_types=1);

namespace Magento\PageBuilder\Setup\Converters;

use Magento\Framework\DB\DataConverter\DataConverterInterface;
use Magento\PageBuilder\Model\Dom\Adapter\ElementInterface;
use Magento\PageBuilder\Model\Dom\HtmlDocument;
use Magento\PageBuilder\Model\Dom\HtmlDocumentFactory;

/**
 * Converter to move padding in full width columns from the main row element to the inner element
 */
class FixFullWidthRowPadding implements DataConverterInterface
{
    /**
     * @var HtmlDocumentFactory
     */
    private $htmlDocumentFactory;

    /**
     * @param HtmlDocumentFactory $htmlDocumentFactory
     */
    public function __construct(HtmlDocumentFactory $htmlDocumentFactory)
    {
        $this->htmlDocumentFactory = $htmlDocumentFactory;
    }

    /**
     * @inheritDoc
     */
    public function convert($value)
    {
        /** @var HtmlDocument $document */
        $document = $this->htmlDocumentFactory->create([ 'document' => $value ]);
        $fullWidthRows = $document->querySelectorAll("div[data-content-type='row'][data-appearance='full-width']");
        /** @var ElementInterface $row */
        foreach ($fullWidthRows as $row) {
            $style = $row->getAttribute("style");
            preg_match("/padding:(.*?);/", $style, $results);
            $padding = isset($results[1]) ? trim($results[1]) : '';
            if (!$padding) {
                continue;
            }
            // remove padding from main row element
            $row->removeStyle("padding");
            // add padding to inner row element
            $innerDiv = $row->querySelector(".row-full-width-inner");
            $innerDiv->addStyle("padding", $padding);
        }
        return $fullWidthRows->count() > 0 ? $document->stripHtmlWrapperTags() : $value;
    }
}
Step 2: Create a Data Patch
Our second task for updating our example Row content type is to create a Data Patch class that implements the DataPatchInterface. Specifically, we need to use the Page Builder UpgradeContentHelper class to apply the converter class to all the database entities where Page Builder content exists. These locations are provided by the UpgradableEntitiesPool, described later in this topic.
For our Data Patch, we’ll create a class called UpgradeFullWidthPadding, which fixes our row padding problem with the following example implementation:
1
2
3
4
5
6
7
8
9
10
11
12
13
14
15
16
17
18
19
20
21
22
23
24
25
26
27
28
29
30
31
32
33
34
35
36
37
38
39
40
41
42
43
44
45
46
47
48
49
50
51
52
53
54
55
56
57
58
59
60
<?php
/**
 * Copyright © Magento, Inc. All rights reserved.
 * See COPYING.txt for license details.
 */
namespace Magento\PageBuilder\Setup\Patch\Data;

use Magento\Framework\DB\FieldDataConversionException;
use Magento\Framework\Setup\Patch\DataPatchInterface;
use Magento\PageBuilder\Setup\Converters\FixFullWidthRowPadding;
use Magento\PageBuilder\Setup\UpgradeContentHelper;

/**
 * Patch upgrade mechanism allows us to do atomic data changes
 */
class UpgradeFullWidthPadding implements DataPatchInterface
{
    /**
     * @var UpgradeContentHelper
     */
    private $helper;

    /**
     * @param UpgradeContentHelper $helper
     */
    public function __construct(
        UpgradeContentHelper $helper
    ) {
        $this->helper = $helper;
    }

    /**
     * Do upgrade
     *
     * @return void
     * @throws FieldDataConversionException
     */
    public function apply()
    {
        $this->helper->upgrade([
            FixFullWidthRowPadding::class
        ]);
    }

    /**
     * @inheritdoc
     */
    public function getAliases()
    {
        return [];
    }

    /**
     * @inheritdoc
     */
    public static function getDependencies()
    {
        return [];
    }
}
Step 3: Update the UpgradableEntitiesPool (for custom entities)
The Magento\PageBuilder\Model\UpgradableEntitiesPool provides the locations in the database where Page Builder content exists by default. These entities include:
cms_blockcms_pagecatalog_category_entity_textcatalog_product_entity_textpagebuilder_template
If your Magento installation does not have any additional entities for Page Builder content (beyond the defaults), you do not need to update the UpgradableEntitiesPool.
However, if you have created additional database entities for storing Page Builder content, you must add those entities to the UpgradableEntitiesPool type in your module’s etc/di.xml. If you do not, the Page Builder content stored in your entity will not be updated, causing potential data-loss and display issues.

For example, if you have created a blog entity that stores Page Builder content, you must add your blog entity to your etc/di.xml file as an UpgradableEntitiesPool type. This entry ensures that the upgrade library can update the Page Builder content types used in your blog. An entry for our blog example might look like this:
1
2
3
4
5
6
7
8
9
10
11
12
<type name="Magento\PageBuilder\Model\UpgradableEntitiesPool">
    <arguments>
        <argument name="entities" xsi:type="array">
            <item name="cms_blog" xsi:type="array">
                <item name="identifier" xsi:type="string">blog_id</item>
                <item name="fields" xsi:type="array">
                    <item name="content" xsi:type="boolean">true</item>
                </item>
            </item>
        </argument>
    </arguments>
</type>
In such cases, your additional entity will be merged with the default entities from Magento/PageBuilder/etc/di.xml:
1
2
3
4
5
6
7
8
9
10
11
12
13
14
15
16
17
18
19
20
21
22
23
24
25
26
27
28
29
30
31
32
33
34
35
36
<type name="Magento\PageBuilder\Model\UpgradableEntitiesPool">
    <arguments>
        <argument name="entities" xsi:type="array">
            <item name="cms_block" xsi:type="array">
                <item name="identifier" xsi:type="string">block_id</item>
                <item name="fields" xsi:type="array">
                    <item name="content" xsi:type="boolean">true</item>
                </item>
            </item>
            <item name="cms_page" xsi:type="array">
                <item name="identifier" xsi:type="string">page_id</item>
                <item name="fields" xsi:type="array">
                    <item name="content" xsi:type="boolean">true</item>
                </item>
            </item>
            <item name="catalog_category_entity_text" xsi:type="array">
                <item name="identifier" xsi:type="string">value_id</item>
                <item name="fields" xsi:type="array">
                    <item name="value" xsi:type="boolean">true</item>
                </item>
            </item>
            <item name="catalog_product_entity_text" xsi:type="array">
                <item name="identifier" xsi:type="string">value_id</item>
                <item name="fields" xsi:type="array">
                    <item name="value" xsi:type="boolean">true</item>
                </item>
            </item>
            <item name="pagebuilder_template" xsi:type="array">
                <item name="identifier" xsi:type="string">template_id</item>
                <item name="fields" xsi:type="array">
                    <item name="template" xsi:type="boolean">true</item>
                </item>
            </item>
        </argument>
    </arguments>
</type>
How to upgrade your custom content types
To use Page Builder’s content upgrade helpers for your own content-type configuration changes, follow these steps:
-
Set up a new environment that uses a copy of your production data, far away from any real data.
-
Create a test branch off your local environment where you can make and test your data patch converters. You will switch back and forth off this branch to reset the data in your Magento instance as needed.
-
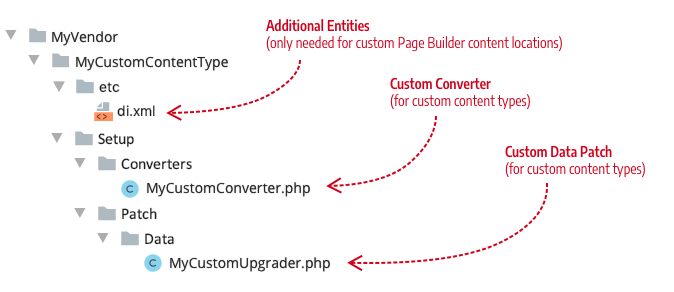
Within the test branch for your content type module changes, set up a directory structure similar to this:

-
Implement the
DataConverterInterfaceto create a converter for your content type, using Page Builder’sFixFullWidthRowPaddingclass as an example. -
Implement the
DataPatchInterfaceto create a data patch for your content type, using Page Builder’sUpgradeFullWidthPaddingclass as an example. -
Make a copy of the data in the
contentfields of existing entities (cms_page,cms_block, and so on). You will compare this content with the content changes made after running your upgrade patch. -
Run
bin/magento setup:upgradeto test your custom conversion.After running
setup:upgrade, you should see an entry at the bottom of thepatch_listtable of your Magento database. The entry uses your module’s namespace with the name of your DataPatch class. So use a descriptive name to ensure thepatch_listentry makes sense to others. -
Compare your post-upgraded content to the previous content.
If the conversion didn’t convert your content as planned, remove your entry from the
patch_listtable, restore your database content to the original values, tweak your converter, then runbin/magento setup:upgradeagain. Repeat as necessary.
How to upgrade overloaded Page Builder content types
If you have overloaded the configurations of native Page Builder content types, you need to review Page Builder’s native configuration changes for each release. If necessary, you will need to create a converter and data patch to customize how the native content types are updated for your changes.
For example, in version 1.3, we updated the configuration of the native Row content type. As mentioned, we moved the padding attribute of the full-width appearance from the <main> element to the <inner> element. So if your Row configuration is different in your custom content type (for example, you removed the <inner> element), then you will need to upgrade your overloaded Row as described in the previous steps.